Getting Started with Steelray Project Viewer
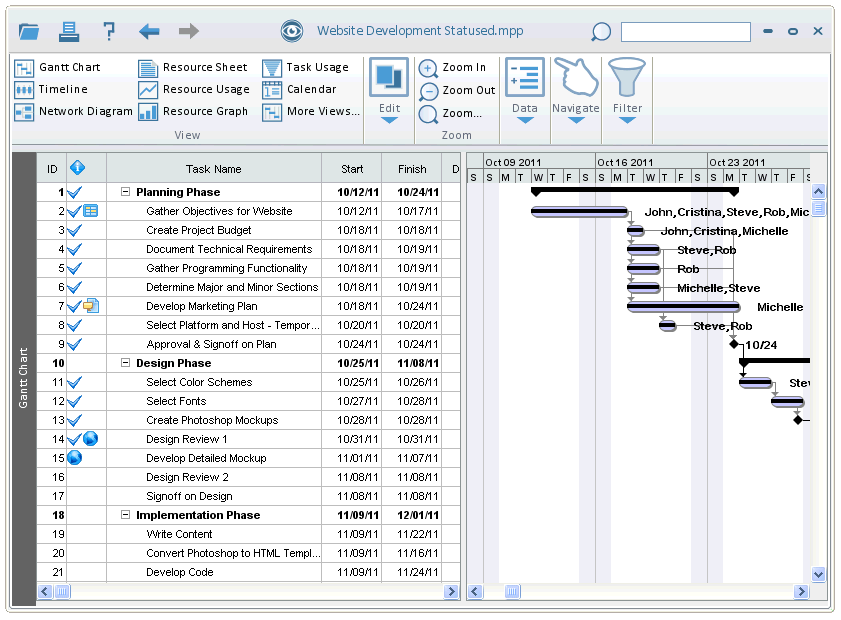
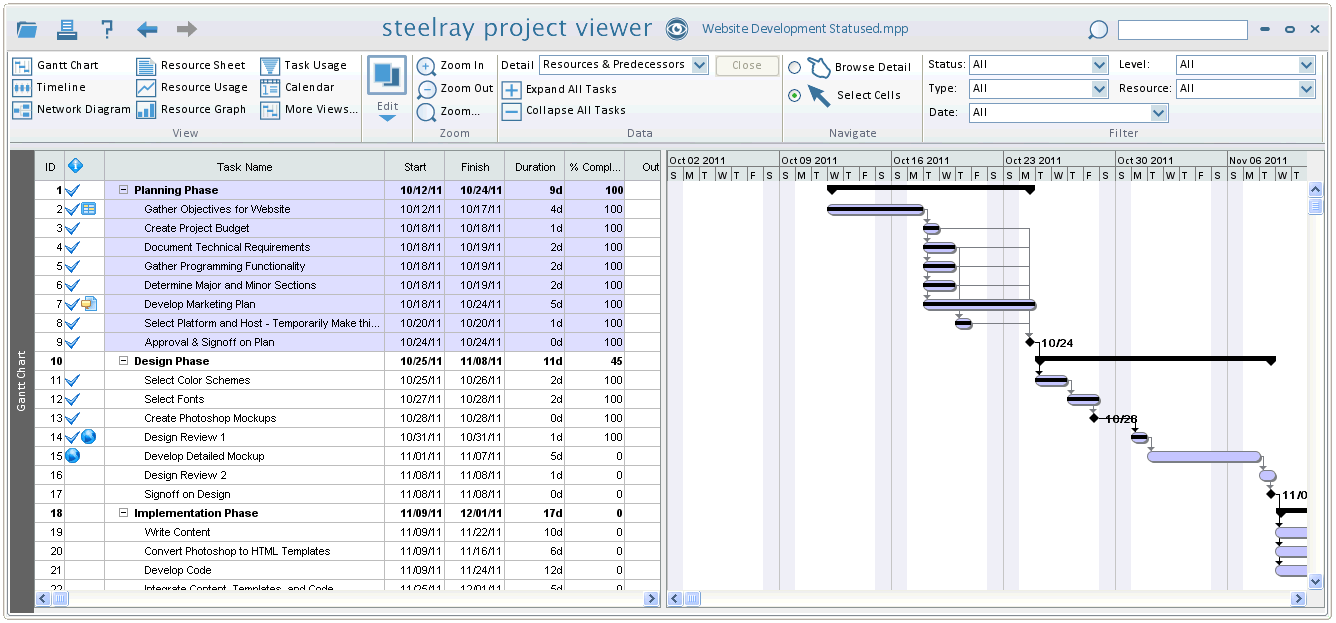
Steelray Project Viewer (SPV) is the world's first Project Navigator. SPV is a powerful tool for viewing, printing, and exporting Microsoft Project files. SPV can view Project files from Project 2007 to Project 2019 and can run on any modern Windows version from Windows 7 to Windows 10, in addition to Mac OS X and Linux.To open any valid project file, click on the folder icon in the top bar of SPV and select "Open...". After selecting your file you'll see the Gantt View for that project. In the left pane you'll see the Gantt Table and on the right you'll see the Gantt Chart (see screenshot below). The splitter can be moved right or left to adjust the view. SPV has eight additional views: Timeline View, Resource Sheet, Resource Usage, Task Usage, Calendar, Network Diagram, Resource Graph, and Task Sheet. Access these views by clicking the appropriate button in the ribbon on the top of the main view.
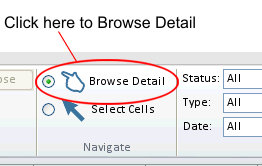
SPV has two modes: Browse Detail (on by default) and Select Cells. With the Select Cells mode, you can switch between views using the left side buttons, select cells for copying/pasting, etc... Browse Detail mode allows you to navigate the project by making the data itself your means of navigation. Click here for a more detailed description of Browse Detail Mode.
The Gantt Table (left pane) describes each task in the project and is fully customizable. You can add or hide any column. Right-click (or Ctrl-click) in the table to use this feature. Using the toolbar labeled "Status", you can filter the view to see only certain tasks, e.g. Overdue, Milestones, assigned to a specific Resource, etc... Click the "Refresh" button to apply any changes to these filters.
The Gantt Chart (right pane) is a visual representation of the timeline of the project. Each task is represented by a colored bar. Other features include percent complete of each task (black bars running through the task bars), the option to display Resources assigned to the task, and five zoom levels.
On the title bar there are a series of buttons. From left to right these are:
-
File Menu: Click to open the file menu showing options to Open .mpp files, Export, Open recents, Print and Preferences.
-
Print: Click to print and preview the current file. You can also change many preferences here to affect the printing appearance.
-
Help Menu: Click to open the help menu to access Documentation, License information, Check for updates, and go to the Steelray website.
-
Back and Forward: Navigate back to previous views and selections and go forward again.
-
Search: Search for text within your project.
Below the title bar is the ribbon control. The ribbon is separated into tabs allowing easy access to all functionality of Steelray Project Viewer From left to right these tabs are:
-
Views: Access all the available Gantt charts and other views.
-
Edit: Copy your selections as well as select all.
-
Zoom: Change the zoom levels for the current view.
-
Data: Expand or Collapse all tasks in the Gantt Charts. Also, specify the type of detail when using Browse Detail
-
Navigage: Specify to browse detail information or to use Select Cells mode.
-
Filter: Apply numerous filters to quickly access the data you need.
For more in-depth Help, pick a topic from the left menu.
Entering a License Key
When you downloaded Steelray Project Viewer (SPV), you probably received a trial key. To continue running Steelray after the trial period, you'll need to purchase and enter a purchased Subscription Key. There are two types of License Keys: Trial and Subscription. Trial keys are valid for a limited time after they are generated and allow all functionality; we do not disable any feature during a trial. Subscription keys are purchased and expire at the end of the subscription, which is typically one year. You cannot run Viewer without a trial or a subscription license key.
NOTE: You can visit our support site at any time by clicking the links in the help box at the bottom of the form or by clicking here.

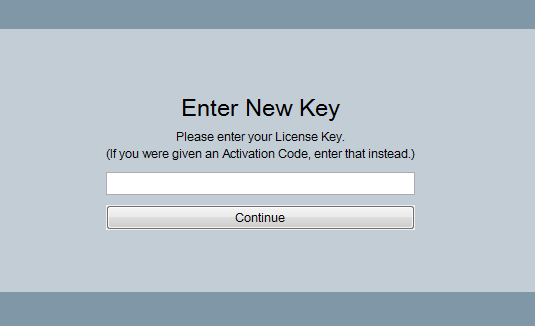
Above is the Manage License Key dialog. This is where your respective license information is displayed. In order to enter a new key, click 'Enter New Key'.
If you copied the the license key or activation code you received by e-mail, you can Right-Click and click Paste, and the key will be pasted into the dialog box.
After clicking Continue Viewer will check the validity of the key you entered.
Gantt View
The Gantt View takes up most of the main window of Steelray Project Viewer and consists of two areas: the Gantt Table, the Gantt Chart. Note that you can move the splitter between the Table and the Chart to see more of one side.
Gantt Table
This area contains tabular data about each task. The schedule type will determine the columns visible by default. For a Microsoft Project schedule (.mpp) the default columns will be Task ID, Indicators, Task Name, Start, Finish, Duration, Percent Complete, and Resource Names. For a P6 XER schedule (.xer) the default columns will be Indicators, Activity ID, Activity Name, Baseline Duration, Remaining Duration, Start, Finish, Resource Names, and Total Slack. Tasks are organized in a hierarchical manner. For example, in this sample project, "Gather Objectives for Website" is a sub-task of "Planning Phase" (see screenshot, below).

Tasks in bold with a collapsed (plus) or expanded (minus) icon left of their task name are Summary tasks, meaning that they have one or more sub-tasks. An expanded icon indicates that the task is expanded, and its sub-tasks are visible. A collapsed icon indicates that the task is collapsed, and none of its sub-tasks are visible. Clicking on a collapsed icon will expand the task, and clicking on an expanded icon will collapse the task.
Adding and removing columns is simple. Right-click (or CTRL-click) on any column (in the header or data), and choose to hide that column, or insert a column immediately before the selected column. You can add any number of columns in any order. The columns that you choose to show (and their order) will be saved from session to session.
You can also resize any column by dragging the border of the column in the table header and dragging it to make it smaller or larger. To move a column, click drag in the column header and move it to the desired location.
The Indicators column is available for Microsoft Project schedules. This column contains various information about a project such as Completion Dates, Hyperlinks, Constraints, and Annotations. In order to view this information, simply hover over the icon of the desired information. To add an Annotation, Right-click (or CTRL-click) on the target task and select Add Annotation. Icons for a given annotation may be selected through the edit annotation window as well. To edit an annotation, simply Right-click (or CTRL-click) the task with the target annotation and select Edit Annotation. Annotations are not stored in the actual project, instead they reside in the settings of Steelray Project Viewer.
Gantt Chart
This is the visual representation of the project timeline.
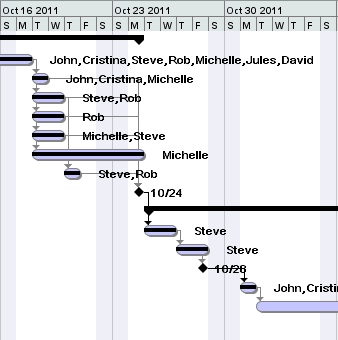
You can Zoom In and Out (using the menu or the toolbar icons) to change to a different time scale. This is the Weekly view. The top of the chart shows a timeline broken down by week and showing individual days. The tasks Start and Finish Dates are indicated by the beginning and end of the lavendar bars (task bars). Percentage complete is shown by the black line running through the task bar. To the right of each task bar are the Resource Names. This is a preference and can be changed in the Preferences Dialog. The arrows indicate the relationship between two tasks. Weekend days are shaded in this view.
Filter Tab
There are five filters in the Filter tab in the Ribbon, each explained below. All filters behave the same way. As changes are made to the available options the Gantt View will refresh with the options that you have selected. Note that all options take effect. For example, if you select Overdue, Summary, and Level 2, only tasks meeting all of those criteria will be displayed (which may be none).
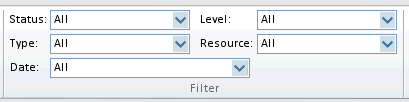
- Status: Choices are Cost Greater Than, Cost Overbudget, Complete, Incomplete, Not Yet Started, Overdue, and Work Overbudget. All of these are self-explanatory.
- Type: Choices are Critical Path, Milestones, Summary, and Inactive. Milestone tasks are those that have been marked as Milestone by the Project Manager and those tasks that have a duration of 0 days. Summary tasks are those that have sub-tasks.
- Date: Choices are Date Range, In Progress Today, Starting This Week, Ending This Week, Starting This Month, Ending This Month, and Should Start By. The option Date Range will allow the user to enter a valid date range. Only tasks that occur within that date range will then be displayed. The option Should Start By will allow the user to enter a valid date and only tasks with a Start Date before or equal to that date will be displayed.
- Level: Choices are 1 through the maximum level of this project. If you choose Level 1, you will see only the top level tasks. If you choose Level 2, you will see only the top level tasks and the sub-tasks immediately below them. Level 3, etc... behave the same way.
- Resource: Choices are all of the Resources assigned to this project. Choosing one will display only the tasks that have that particular Resource assigned to it.
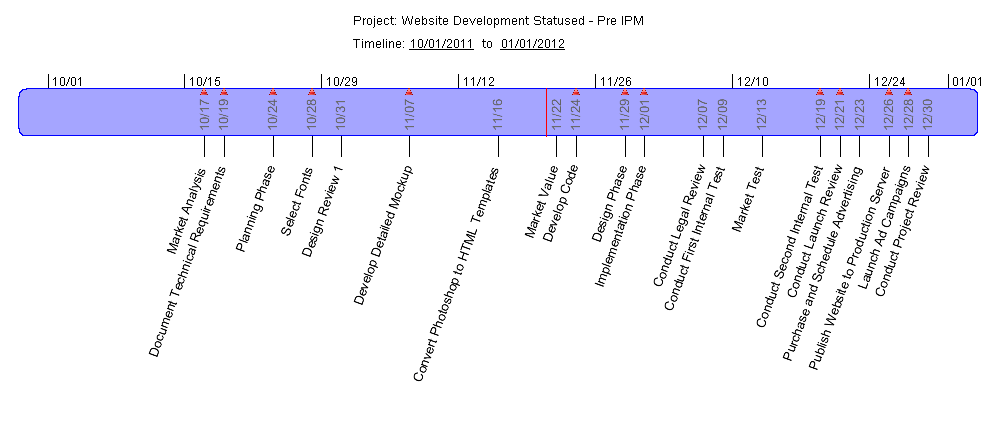
Timeline View
The Timeline View displays information about specific tasks along a timeline, which may be useful in a presentation. By default, the Timeline View displays Milestones and encompasses the entire timeline of the project.
The Timeline View has two orientations that can be selected from the Timeline toolbar: Portrait and Landscape. Choosing Landscape presents a view like this:
Choosing Portrait presents a view like this:
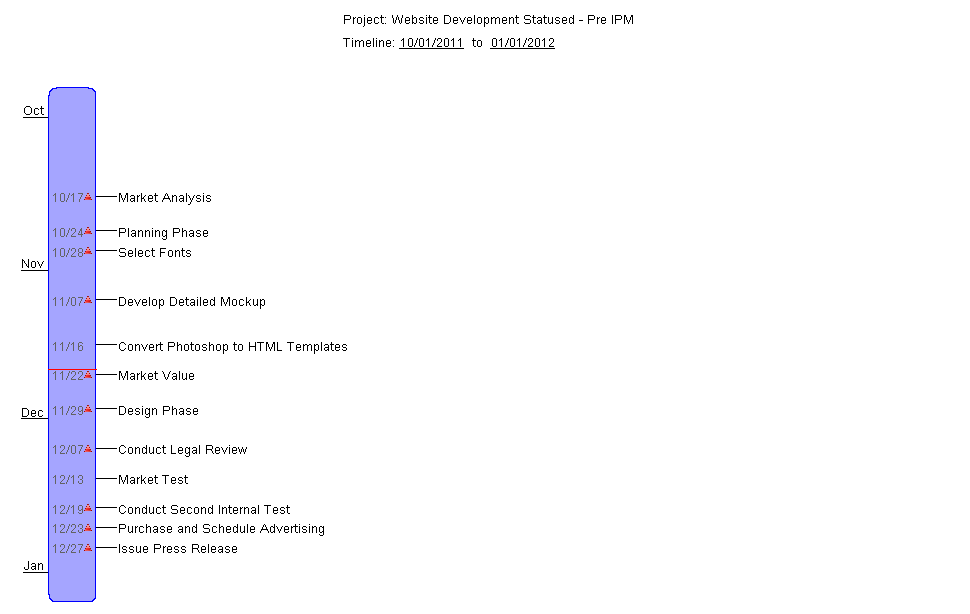
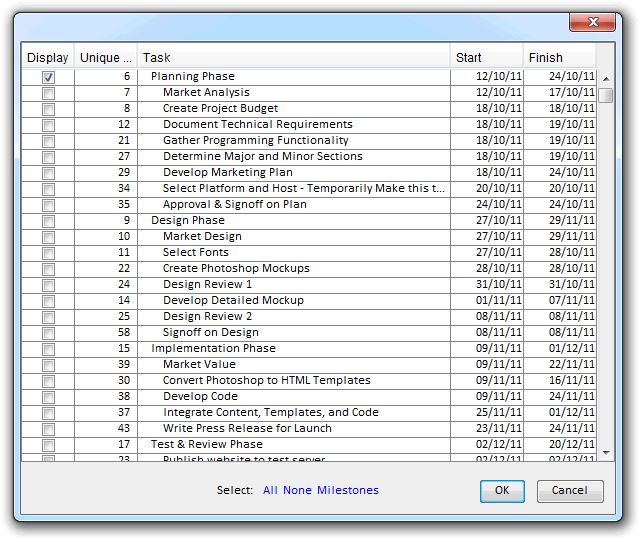
The tasks that are displayed can be changed by selecting "Select Tasks..." in the Timeline toolbar. In the Select Tasks dialog you can choose individual tasks to display in the Timeline View. To aid in selecting tasks more quickly you can choose All, None, or Milestones, which will toggle the appropriate tasks.
You can also change the dates of the Timeline View by clicking on either the start or end date at the top of the view.
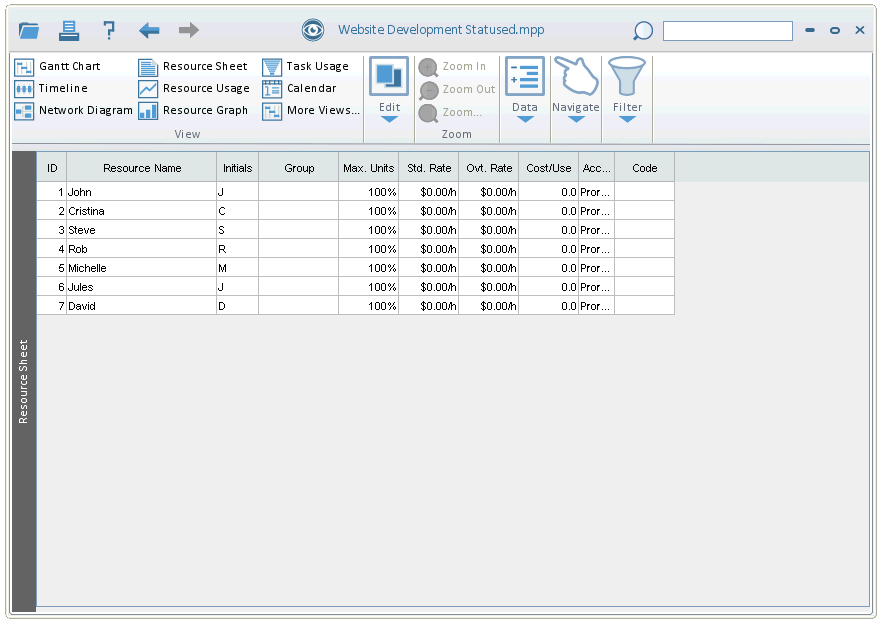
Resource Sheet
The Resource Sheet View displays information specific to each Resource. In this View you see each Resource's Name, Initials, Group, Rate, etc...
Resource Usage View
The Resource Usage View displays information about each Resource's usage as a whole and by Task.
The left side view displays Resource ID, Resource Name, and Work. The Work displayed on a Resource line is the total Work for that Resource. Work displayed on a Task line is the amount of Work for that Task for the listed Resource. Expanding or Contracting a Resource affects that Resource only.
The right side displays information by time period for the corresponding line on the left side of the View. Zooming In and Out works as it does in the Gantt View. There are five levels, and each column represents a different time period in each zoom level.

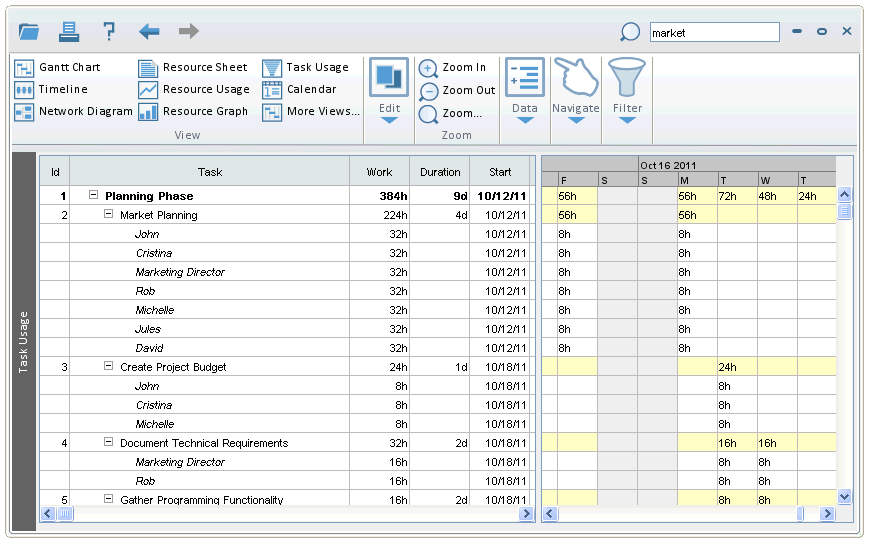
Task Usage View
The Task Usage View displays information about each Task as it relates to the assigned Resources.
The left side view displays Task ID, Task Name, Work, Duration, Start, and Finish for each Task. The Work (and Duration) displayed on a Task line is the total Work (or Duration) for that Task and all of its child tasks. Work displayed on a Task line is the amount of Work for that Task for the listed Resource. Expanding or Contracting a Task affects that Task only. Resource lines display information specific to that Resource's involvement in this Task.
The right side displays information by time period for the corresponding line on the left side of the View. Zooming In and Out works as it does in the Gantt View. There are five levels, and each column represents a different time period in each zoom level.
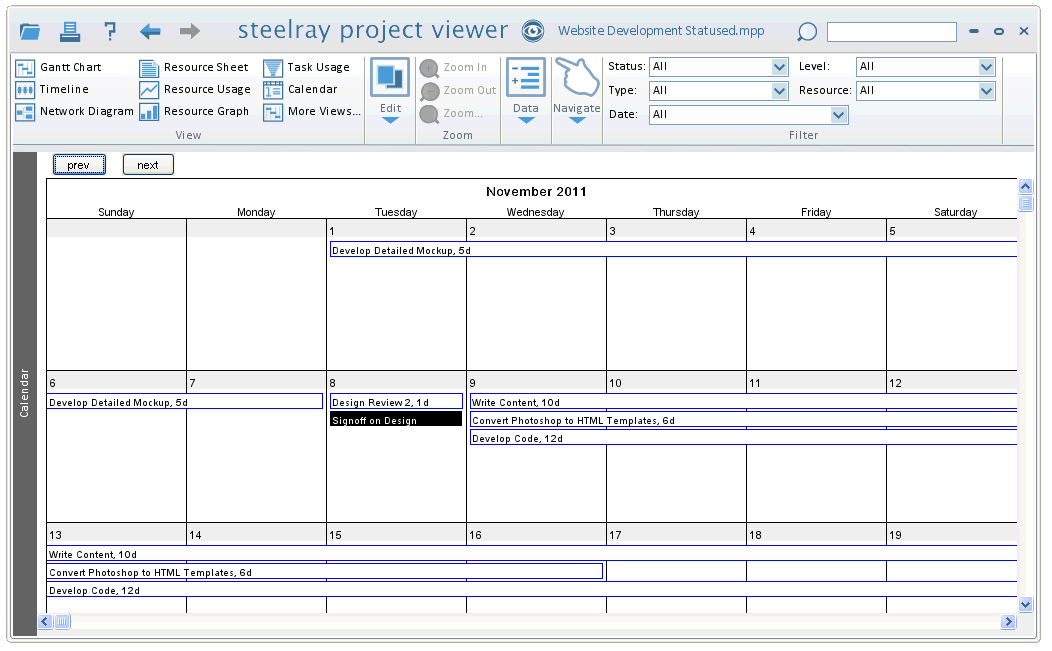
Calendar View
The Calendar View displays one month at a time. Tasks are represented by bars (with Task Name and Duration) spanning one or more days. Clicking prev or next in the upper-left corner changes the month shown. Milestone Tasks are displayed with a black background and white text. To see a complete list of Tasks for a certain day, click that day in the View, and a list of those tasks will appear.
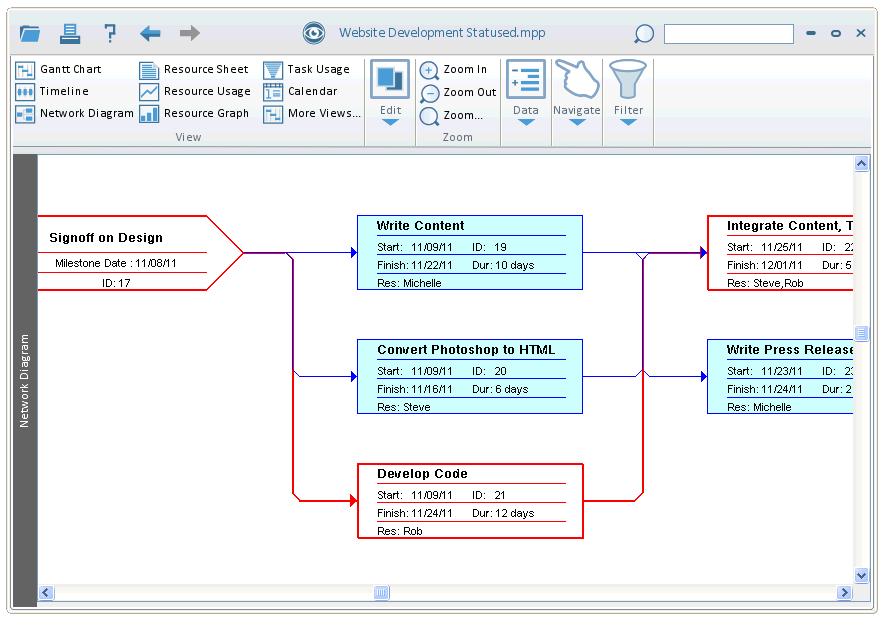
Network Diagram View
The Network Diagram View displays information about the project's Task in a manner similar to a PERT Chart.
Each task is represented by a box of a certain shape and color. Shapes: Standard tasks are rectangles. Summary tasks are trapezoids. Milestones are hexagons. Colors: Standard tasks are outlined in blue and have a light blue background. Critical tasks are outlined in red and have a white background.
Task's predecessors and successors are shown by connecting lines and arrows. Summary tasks can be collapsed (hiding all of its child tasks) or expanded (showing all of its child tasks) by pressing the plus or minus symbol on the upper left of each summary task's box.
Each task's box contains information about that task. Standard tasks display the task's ID, Start and Finish Dates, Duration, and Resources used. Summary tasks display Percent Complete instead of Resources. Milestone tasks display the Milestone Date and the task's ID.
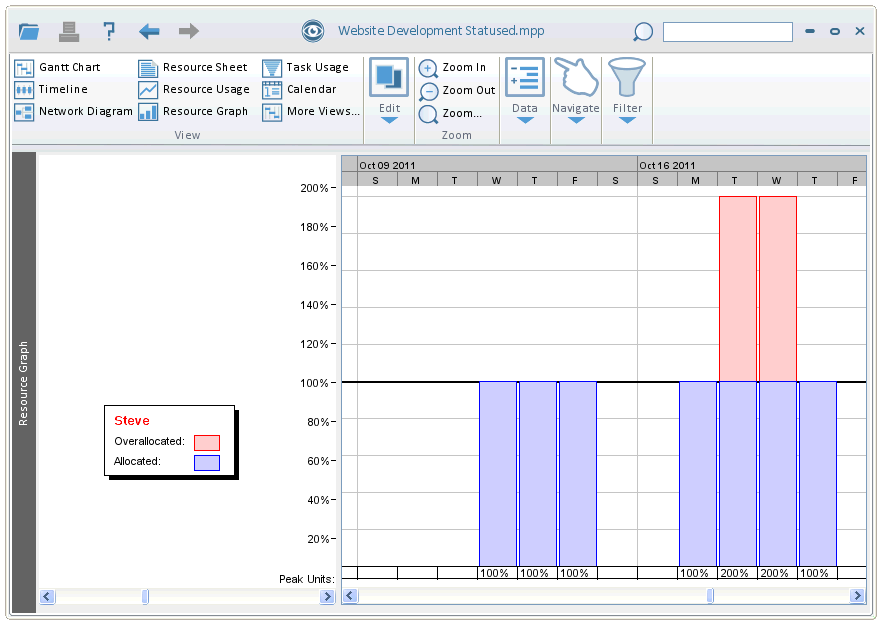
Resource Graph View
The Resource Graph View displays information about the project's Resources.
The left side of the view display's a Resource's name. The user can scroll through resources by adjusting the horizontal scroll bar.
The right side of the views displays a vertical bar showing that resource's allocation for the time period specified in the header. If the resource is overallocated for that period, the vertical bar is red above the 100 percent mark.
Task Sheet View
The Task Sheet View is identical to the left side of the Gantt Chart View. This view is convenient for just listing all of the tasks. See Gantt View for more information.
Navigation to Browse Detail
Steelray Project Viewer (SPV) is the World's First Project Navigator. SPV isn't a plain 'clone' of Microsoft Project. It makes viewing a project easier and in many ways a better experience than other viewers and even Microsoft Project itself by making the data itself your means of navigation. With Browse Detail enabled (enabled by default), you can use SPV as you would a web browser. Task Names, Resources, and Dates can be clicked to reveal more information about that particular item.
When browsing detail, the cursor changes to a hand shaped icon when you can click an item for a more detailed view. There are three different items that you can click:
- Task Name: Clicking a Task Name shows the Task Detail View.
- Date: Clicking a Date shows the Date Detail View.
- Resource: Clicking a Resource (or a list of Resources) shows the Resource Usage View filtered by the Resource(s) that you clicked.
SPV keeps track of your last ten views within the same MPP file. The Back and Forward buttons on the far left side of the toolbar work exactly like a web browser's Back and Forward buttons. Opening a new file resets the saved views.
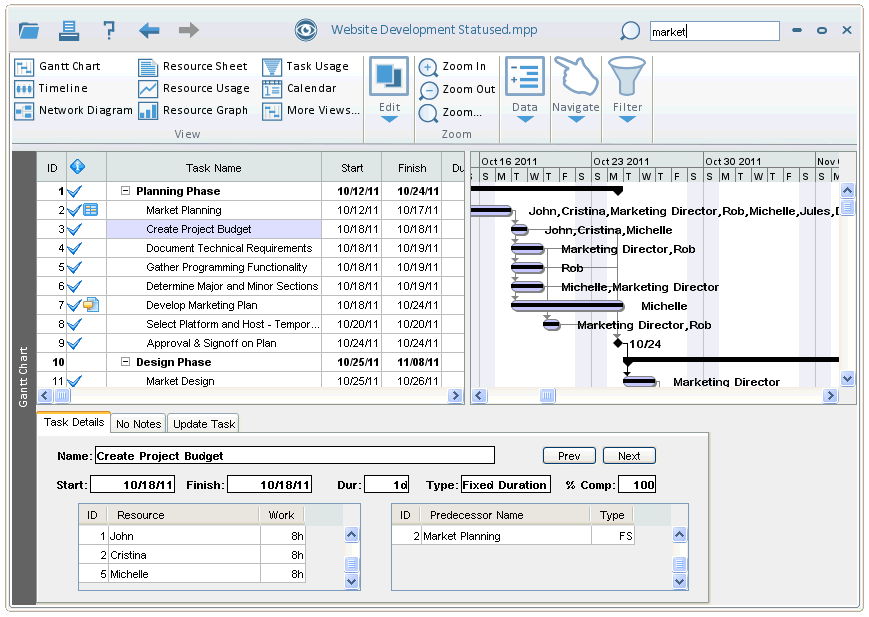
Task Detail View
The Task Detail View contains the most important information about a particular task. You can see Name, Start, Finish, etc..., but also the Resource(s) assigned to the task, as well as it's Predecessor(s), both in tabular form. You can click in either of the tables to bring up those Resources or Predecessor Tasks. The Next and Prev buttons navigate through the current top view's tasks.
The Notes tab contains notes for the Task, if any. No Notes will be displayed if there are no notes associated with this task.
Date Detail View
The Date Detail View is a flexible way to look at tasks grouped by a time frame.
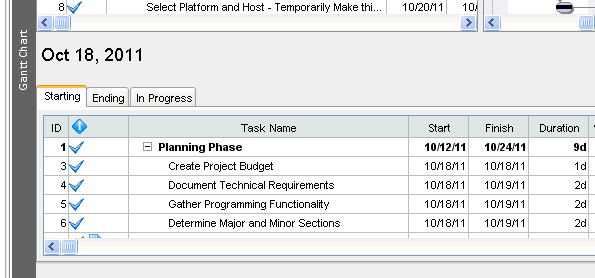
By default, clicking a date will show the Date Detail View for that date only. You can change the time frame by selecting Day, Week, Month, Quarter, or Year from the drop-down menu in the upper right of this view. Selecting Week will show all tasks from the previous Sunday to the next Saturday, for example. Selecting Month will show tasks for that calendar month, and so on.
There are three tabs in this view: Starting (default tab), Ending, and In Progress. Selecting the Starting or Ending tab will show all tasks starting and ending, respectively, for the selected time period. Selecting the In Progress tab will show all tasks in progress (including starting and ending) for the selected time period.
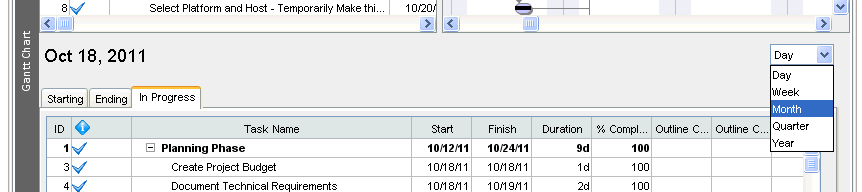
The tables in this view function exactly like the Gantt table with respect to Navigation Mode. That is, clicking any Task Name, Date, or Resource will show the appropriate Detail View.
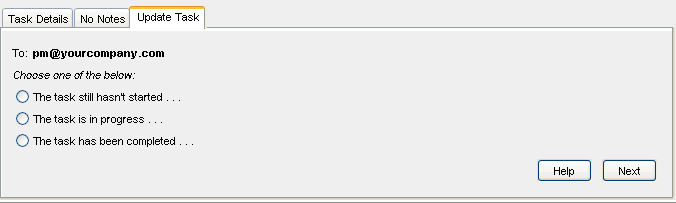
Task Update
Using Task Update, you can notify your project manager by e-mail of updates of your progress within a project. The Project Manager must set the e-mail address in Microsoft Project to which all updates will be sent. To set this field, open Microsoft Project. Open the File menu, then select Properties. Choose the Custom tab. In the Name field, type "Steelray Email" (without the quotes and it is case sensitive!). In the Value field, enter the update e-mail address, then click Add and save the file. Task Update will only be enabled in Steelray if this field is set correctly.
To access Task Update, in Browse Detail Mode click any task to bring up the Task Detail View and select the Update Task tab. You must enter your e-mail information in the Preferences dialog prior to updating a task. In the E-mail section of the Preferences dialog, set the following: In the From box, enter your e-mail address. In the SMTP box, enter your SMTP server's address (typically mail.companyname.com or smtp.companyname.com). In the Port box, enter your SMTP port number (typically 25, but gmail uses port 587). If you are unsure of any of these settings, contact your network administrator.
The Project Manager's e-mail address, which will receive all update e-mails, is displayed here. Below this are three choices:
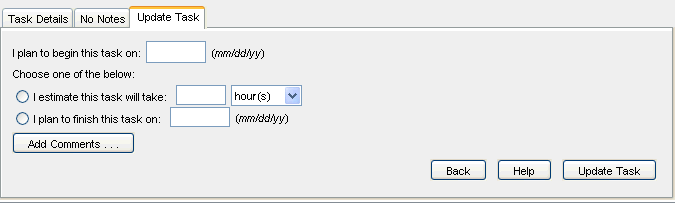
- The task still hasn't started: Select this option to update the planned start date and the planned finish date or estimated duration.
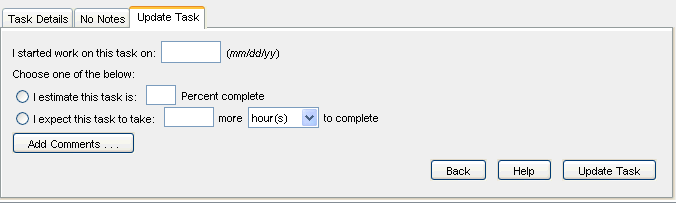
- The task is in progress: Select this option to update the actual start date and the percent complete or remaining duration.
- The task has been completed: Select this option to update the actual start date and the actual finish date or actual duration.
The task still hasn't started: In this tab set the date that you plan to start the selected task. Then select one of the two choices below: estimated duration or planned finish date. If you select estimated duration, you must select an option in the drop-down list (hours, days, etc...) and enter a valid number. If you select planned finish date, you must enter a valid date (the format is displayed for you to the right of the box).
The task is in progress: In this tab set the date that you actually started the selected task. Then select one of the two choices below: percent complete or remaining duration. If you select percent complete, you must enter a number between 0 and 100. If you select remaining duration, you must select an option in the drop-down list (hours, days, etc...) and enter a valid number.
The task has been completed: In this tab set the date that you actually started the selected task. Then select one of the two choices below: actual finish date or actual duration. If you select actual finish date, you must enter a valid date (the format is displayed for you to the right of the box). If you select actual duration, you must select an option in the drop-down list (hours, days, etc...) and enter a valid number.
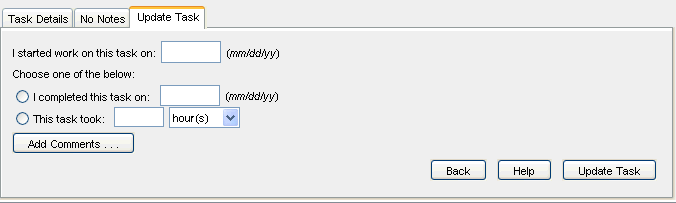
After entering the correct update information, click the Update Task button. This will generate an e-mail and send it to the e-mail address stored in the MPP file. You will see a status box indicating success or any errors.
NOTE: If you are seeing an error such as "Username and Password not accepted", it could be a security setting with the outgoing email account (the FROM email account configured above). What this means for gmail users, is that you will need to go into your Google account and turn ON the option to allow less secure apps. To change this setting in gmail, go to https://myaccount.google.com/lesssecureapps
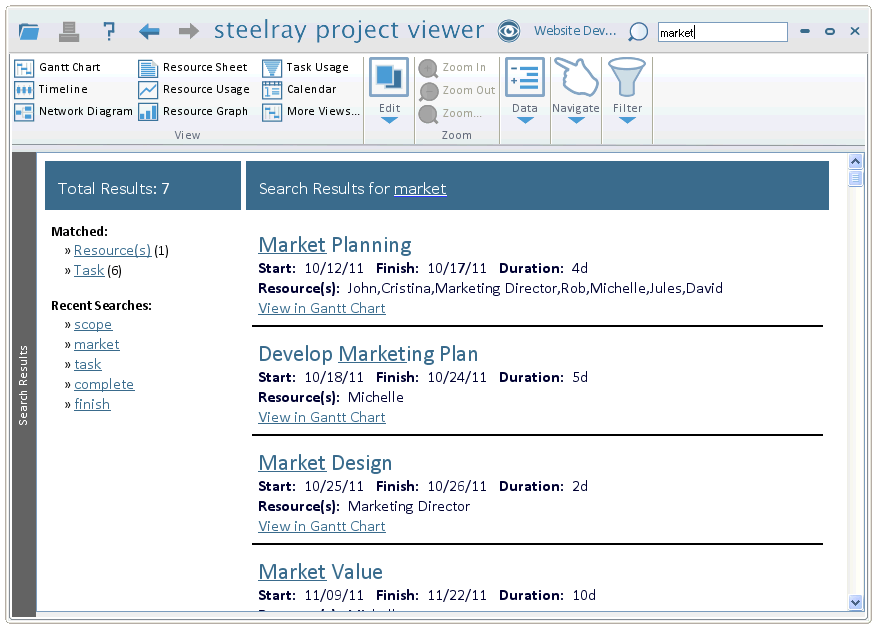
Search
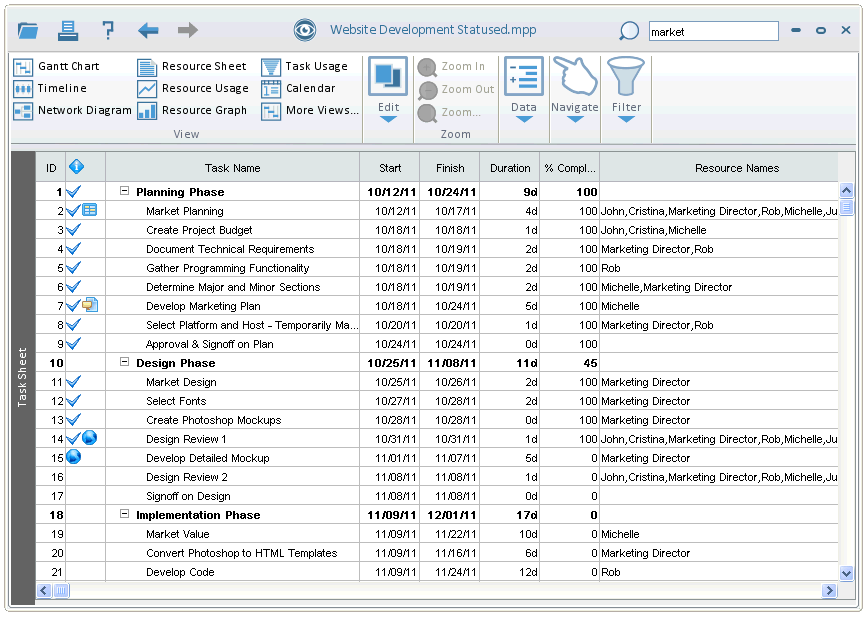
Combined with our Project Navigation, Search allows you see any piece of data and all related items quickly.
Just type in a word, name, or date in the Search text box, click Search (or press Enter), and you'll see all results related to your search organized by category. The text search is case-insensitive. In the example below, searching for 'market' finds two categories of results: Resources and Tasks. One Resource has the word 'market' in it, which is highlighted. Six tasks have the phrase (to see the Tasks, click the Task (6) link on the left). To search on a date, the date must be entered in the format selected in the Preferences Dialog.
In the search results pane, click any link (underlined blue text) to see the Detail View for that item.
Under the matched results, the recent searches are listed. Just click on any of them to perform that search again.
Printing and Print Preview
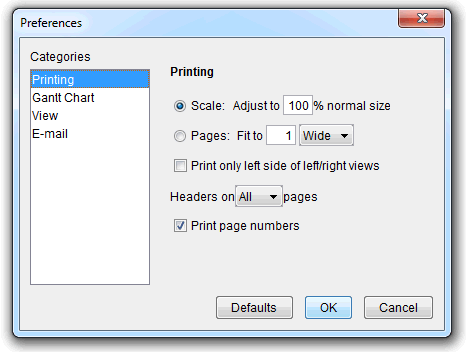
Printing is easy in SPV. To print with the current settings (see Preferences), just choose Print from the File menu (or title bar icon), choose Portrait (default) or Landscape orientation and set the Margins (default 1 inch), and click OK. Your printer dialog will open and you can print to any available printer on your system.
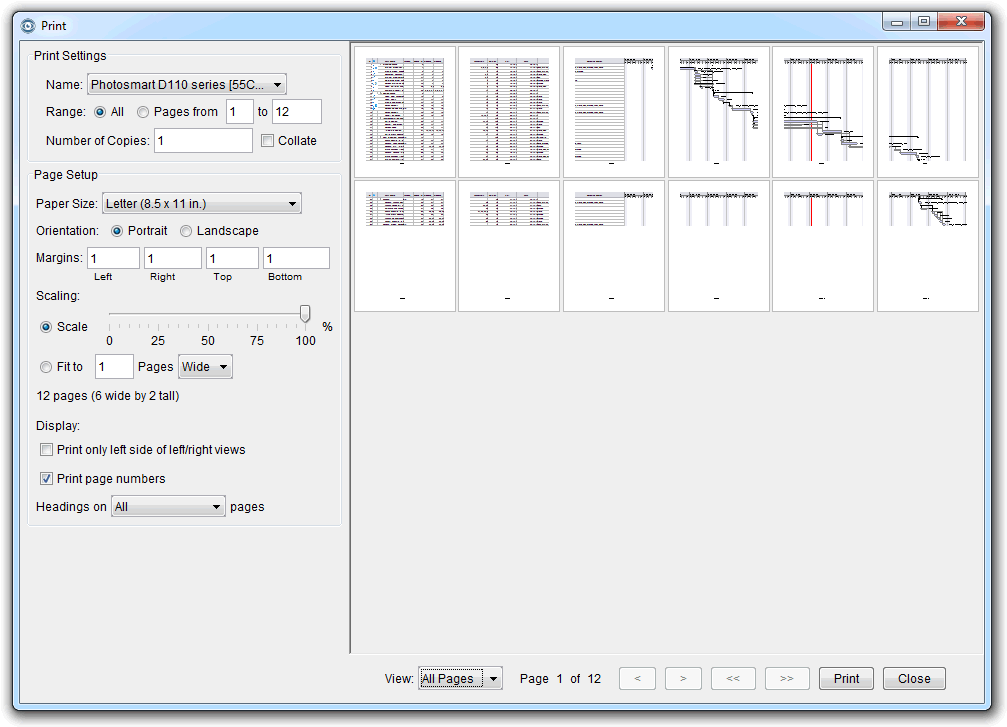
Under Print Settings you can select the printer to print your document, as well as, the range of pages to print and the number of copies and whether to collate.
Under Page Setup you can specify the paper size, orientation of either portrait or landscape and margin size.
By default, Steelray Project Viewer will scale your output to 100 percent of what is shown in the view. Or you can change to the scale to any other pecrent less than or equal to 100.
Alternatively, you can specify to fit to the number of pages and whether to print wide across or tall from top to bottom.
Below this section is the total number of pages to be printed along with how many horizontal and vertical pages to be printed.
You can also indicate the following:
-
Print only left side of left/right views
-
Print Page Number
-
Headings on pages
Using the buttons at the bottom you can print, close the window, and view any page that is to be printed.
-
View allows viewing a page at 100%, one page to fit, or all pages
-
Print closes the dialog and prints the file as you see it
-
Close exits the dialog without printing.
-
Next/Previous advances to the next or previous page in the printout.
-
First/Last advances to the first page or last page in the printout, respectively
Export
You can export the Gantt Table (not the Chart) or the Resource Sheet to two formats in SPV: CSV (Excel) or HTML. Take the same steps to export to either format: On the File menu, choose either Export CSV or Export HTML. Export CSV (Excel) exports to a comma separated file, which is easily viewable in Excel, or any spreadsheet program. Export HTML exports to a standard HTML table, viewable in any web browser.Copying cells to the Clipboard
To copy any or all of the cells to the clipboard, you must first be in select mode. Enter select mode by selecting Select Cells in the Navigate tab in the Ribbon.
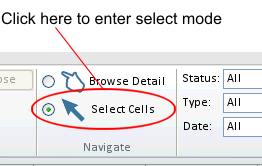
In select mode, clicking on any cell in the Gantt Table will automatically select that cell. To select more than one cell, click in a cell and hold down the left mouse button, drag the mouse to the last cell, and all cells in between will be selected. To select all cells easily, just choose Select All from the Edit menu. Lavender indicates a selected cell.
You can choose Copy by clicking the Copy icon in the Edit tab in the Ribbon, or press Ctrl-C to copy the selected cells to the clipboard. You can then paste the cells into any application that accepts Paste from the clipboard.
With some views, you can select either the left or right side of the splitter. Making a selection on one side deselects the other side. Choosing "Select All" will select all cells on the side where a selection was already made, or the left side if no selection was active.
Preferences
The Preferences Dialog is where you can change the behavior of SPV.
To find the prefences, click on the Folder icon in the top bar and select Preferences
Click OK to accept any changes. Click Cancel to exit the dialog without saving changes. Click Defaults to restore the program defaults.
There are four categories: Printing, Gantt Chart, View, and E-mail.
Printing
You can select to print by Scale (default) or by Pages. Printing by Scale allows you to set a percentage of normal size to print (max 100%, which is also the default). Printing by Pages gives you two options. Printing by pages Wide sets the maximum number of horizontal pages that will be printed. Likewise, printing by pages Tall sets the maximum number of pages vertically.
Print table only (not entire chart): Check this box to print just the Gantt Table (no graphical chart). All visible columns will be printed.
Headers: Select All (default) to see the Gantt Chart Header (date information) on all pages. Select Top to see the headers on the top pages only. Ex. If the printout is 3 pages wide by 4 pages tall, printing headers on Top pages will result in the headers being printed on the first 3 pages only.
Page Numbers: Check this box to see page numbers at the bottom of each printed page (checked by default).
Gantt Chart
Choose what to display to the right of a task bar in the Gantt Chart.
No Text: Displays nothing (default).
Resources: Displays all Resources assigned to this task separated by commas.
Percent: Displays Percent Complete for this task.
Task Name: Displays the name of the task.
Display last view from Project: If checked, when a MPP file is opened, SPV will display the same columns as they were saved in the Gantt Chart View in Microsoft Project. Any filter that was applied will be preserved upon opening as well.
Draw Dependency Arrows: If checked, dependency arrows in a Gantt Chart will be drawn.
Clicking Defaults from the Gantt Chart category will also reset the visible columns and their widths.
View
Choose the date format to display in the Gantt Table.
Months First: Choose to display Months first, e.g. "12/31/2008" (default).
Days First: Choose to display Days first, e.g. "31/12/2008"
You can also choose the date separator and one of nineteen date formats.
Use Project Date Format: If checked, the date format used in the MPP file will be applied.
If you use our Task Update feature, you will need to input your From: e-mail address, your SMTP server (SPV only supports unauthenticated SMTP at this time), and your SMTP port (typically 25, but gmail uses port 587).
Help Menu
The Help Menu is where you go to check for updates, re-enter your license key and get help on Steelray Project Viewer (SPV).
To find the Help Menu, click on the ? in the top bar of SPV.
Your options are:
Steelray Help: This help file.
Manage License Key (click to find out more):
Go to Steelray Website: Click here to be taken to the Steelray Website. Here you can find the latest news about SPV.
Order Steelray Project Viewer: Click here to be taken to the Order and Pricing page on the Steelray Website.
Check for Updates: Click here to be taken to the Steelray Updates page. Here you can check for a newer version of Steelray and see the features and changes in our latest release. We release more often than most companies, so check here often for improved version of SPV.
About Steelray Project Viewer: Click to find out the version of SPV that you are running.